


Operation Guides
Building your UST
Before you begin:
- This guide was written and coordinated by members of the UTAU community and has no affiliation with the UTAU software itself or its creator.
- This guide was written with users of WINDOWS 10 in mind, advice does not immediately translate to other operating systems or other versions of UTAU, such as UTAU-Synth for MacOS.
- This guide relates to the original UTAU software by Ameya which released in 2008 and NOT OpenUTAU, the fanmade UTAU alternative, as such the utility of this resource may vary.
- While the process of operating UTAU is ultimately safe when done correctly, JOEZCafe and other parties involved in JOEZUTAU projects take no responsibility for any incidents, loss or damage to users or property from following these instructions.
Starting a UST file
A UST is a project file that allows your UTAU vocalist to sing, when you open UTAU, it puts you into a blank UST straight away.
This section of the guide will go over the initial sections of UST making that come into play in all bank types before doing any steps that are specific to certain banks.
Before we begin, you'll want to ensure that the vocalist and sampler you'd like to use in the project are currently active by navigating to Project(P) > Project Property(R) as we've covered in previous sections.
MIDI Importing
USTs can be made by hand in the UTAU software itself (Which will be covered later in this section), but it's highly recommended that your UST is mapped out by creating a MIDI file to import into the software.
MIDIs are files that contain raw music data and are made via external music programs like FLStudio and Studio One.
For practising the software or making covers quickly, JOEZUTAU contains an archive of MIDI files you can find HERE, feel free to download one now as you follow this guide!

Once you have a MIDI charted out and exported, open UTAU and navigate to File(F) > Import(I).
Then in the following Import window, open your MIDI file.

UTAU will then ask you which track of the MIDI file you'd like to Import, select your desired track and then select OK.
Note: UTAU USTs are exactly one track, to make additional tracks such as additional vocalists or harmonies, you have to make a separate UST project file for each track.

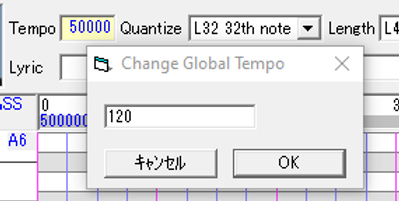
UTAU is prone to an importing error on some MIDI files wherein it will create a tempo marker of 50,000 and the notes will appear distorted as pictured below, but this is easily fixed.

Navigate to the blue tempo marker on the top left of the viewport, right click it and select "Remove Tempo Marker".

With the tempo marker now deleted, double click on the Yellow Tempo box and change the Global Tempo to the BPM of the song your vocals are for.
Note: While UTAU allows for any BPM, USTs can only be charted in 4/4 Time Signature, but UTAU can provide vocals for songs of any time signature without syncing issues so long as the tempo is correct.
If you've made a base UST using the MIDI Import process, please continue reading the rest of the information in this section of the guide, as learning how USTs are done by hand will help you in making necessary edits as you work on your vocals.
Optional: Enabling MIDI to preview notes
For those who wish to preview notes before placing them, UTAU does let you preview by clicking on the piano roll on the left hand side, but UTAU's MIDI output must be enabled first.
Navigate to Tools(T) > Option(O) on the top bar of UTAU, then change to the MIDI tab in UTAU's Option window.

Ensure the MIDI OUT is set to Microsoft GS Wavetable Synth, then click OK.
Once the Option window is closed, select the speaker icon in the top toolbar (Highlighted Red in the above screencap).
Your piano roll should now play piano tones to the respective key you click on.
Making USTs by Hand & the Magnetic Timeline
In the previous section, we showed how to chart USTs via importing a MIDI file, but USTs can also be done by hand in UTAU itself, while this process is not recommended as it's generally more challenging and time consuming, there are aspects of the process that come into play as you edit your UST later on, so reading this section is recommended nevertheless.
UTAU uses a Magnetic Timeline.
This means that notes automatically snap together and it is technically not possible to make any gaps in the UST that don't contain any song data.
While we learn how to chart out a UST, we will also be learning how to navigate around the magnetic timeline to make the vocals you wish.
Feel free to go ahead and make a blank UST to mess around with the note creation tools as you follow this guide, giving you tangible examples of each gesture and option.
Using the Pencil Tool located on the toolbar at the top of the screen, you can click and drag to make new notes. With digital vocals, you'll want to create a new note for each syllable in the lyricism.
When adding a new note at the latest point of the sequence, the note will always start at the ending point of the note that came before it, and will end at the horizontal position of the mouse cursor, this is the Magnetic Timeline at play, any note you make at the end of the sequence will always begin on, or "snap to" the note that came before it.
Note: UTAU is automatically Quantized or in other words Grid Snapped, you can adjust how broad or precise this is by going to the Quantize dropdown list on the top toolbar of UTAU.
"L32 32th note" is fine for newcomers, while "L64 64th note" is recommended for precise tuning and tweaking when working with complicated voicebank types, such as CVVC or Arpasing.

If you place new notes midway through the sequence, UTAU will take any overlapping notes or later and shift them further down the timeline, this affects every single note after the new note you've placed, so be mindful of how this affects the timing of your UST.


As we mentioned prior, it is impossible to make any gaps in the UST due to the Magnetic Timline, but that doesn't mean we can't separate vocal phrases or make any pauses in the sequence.
Instead, separating notes is done by placing Rest notes in your sequence, these make absolutely no sound and mute any prior notes, acting as a substitute for gaps.
Rest Notes are created via one of three methods:
- Clicking the R+ button on the top toolbar, if a note is selected, this creates a Rest before the selected note, if no notes are selected, this creates a Rest at the very end of the sequence.
- Double clicking an existing note to edit its lyric and entering a romanised, capital "R", this turns the note into a rest note, you can also edit this lyric again to change it back into a normal note later on if you change your mind.
- In UTAU, clicking and dragging the far right hand side of a note lets you resize it.
If you're shortening a note and there are notes followed after (In other words, if the note is partway through the UST), the gap left from shortening the note will become a Rest.

As you place notes and Rest notes, you'll want to keep the following aspects of UTAU's controls in mind:
- As previously mentioned, clicking and dragging the right hand side of a note lets you resize it, you can only extend a note to be longer if it's the current last note in your UST, otherwise you can only shorten it, creating a Rest note in the gap leftover.
- If you resize the end of a note while holding down CTRL, you will not only be able to elongate or shorten your selected note, but the following note in the sequence will resize itself to accomodate the new length, this is handy for adjusting the timing between two notes without throwing off the timing of the whole UST or making unnecessary Rest notes.
CTRL Dragging can even be done with Rest notes, making it a really useful way of adjusting the length of notes midway through a UST without affecting the other notes in the sequence.


- If you resize the end of a note while holding down SHIFT, the selected note will change length and the ENTIRETY of the UST following that note will shift earlier or later to snap to the selected note's end point.
SHIFT Dragging can even be done with Rest notes, just like CTRL Dragging, making it extremely useful as a means of repositioning or resyncing the entire UST without editing any of the notes themselves.


- You can only resize notes by dragging the note's ENDING, if you want to adjust the position of the note's starting point, you do so by adjusting the end point of the note before it, even if it's a Rest Note.
- If a note is in the wrong semitone and you want to move it up or down, you do so by clicking and dragging the BOLD line at the VERY BOTTOM of a note, clicking and dragging the main body of the note simply adjusts the Intensity, which is the note's volume level.
- Clicking and dragging notes this way also allows you to insert existing notes into other areas of the UST by shifting them left and right.
Similarly to creating new notes partway through the UST with the pencil tool, the note you're moving will "Push" the note it is overlapping with and any notes that follow to later in the sequence. This technique is most useful for swapping audible notes with rest notes, repositioning them in the timeline.
- By default, notes can only be moved one at a time, to highlight and move multiple notes at once, ensure that the blank box in the far bottom-right corner of the screen has an M inside of it, if it doesn't, simply click it to enable Multi-Dragging.

- If you want to move an entire selection of notes by a specific amount (eg. moving a vocal phrase to a different key or octave), simply highlight all the notes you want to adjust, then navigate to Edit(E) > Move Region By Number(N), then enter in the dialogue box how many semitones you want to adjust the highlighted notes by.
Entering a number as is raises the notes, but entering a negative value with a hyphen (-) lowers them.

Additional Tweaks
Regardless of if your UST is a MIDI import or was made by hand, at this stage, you should have a fully synced and notated UST file that's ready to be edited around whichever voicebank type you're using, but some additional measures should be done to smoothen the process.
We now need to reformat all of the notes in the sequence so your vocalist can sing them without any problems such as glitches or timing issues.
Begin by selecting all of the notes in your UST with CTRL+A, then Right Click on any note and navigate to Region Property to open the Note Properties window, this window is a common tool we will be using a lot in our UST process.
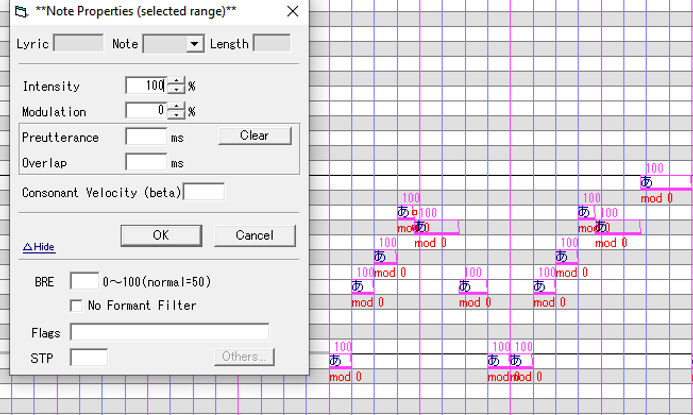
Carry out the following processes in this menu:
- Make sure Intensity is set to 100 on all notes, this is the volume level of each note.
- Make sure Modulation is set to 0 on all notes, Modulation is a parameter that sets how intense UTAU's pitch correction system is, 0 puts it on its strongest while 100 puts it at its most relaxed, sounding closer to how the sample was originally delivered by the voice provider.
Having Modulation set to 0 on most notes is recommended as it ensures the vocals stay in tune.
Important Note: You'll want to be checking the Modulation of your notes as you work on your UST as some notes are not created with 0 as their default value, pressing Z on your keyboard will turn on the note properties display, which will show the modulation of every note on the viewport as you work on your sequence.
- Click the "Clear" button next to Preutterance and Overlap, these two are timing values that are referenced by the voicebank's configuration and are not edited during normal use of the software except for fixing voicebanks that have errors in their configuration.
Clearing ensures there aren't any existing or locked in values on the notes themselves.
- Make sure STP is completely blank (Not Grey, as that means there are varying STP values between notes, the box must be White), STP locks in a note's timing values regardless of any adjustments made to the note, like the sample it uses, ensuring this value is clear will reduce any chances of errors in the vocals.
Once these changes have been made, click OK, your blank UST is now ready to use.
Markers
You can place two types of timeline markers on your UST which can help with the editing process, these are both placed on the Tempo Timeline above the viewport.
These markers are placed by right clicking the Tempo Timeline at the top of the viewport on the section of the UST you'd like to place the marker in.
When a marker is created, it is attached to the note it overlaps with, making that note the starting point of the marker's effect, for example: if you want a marker to activate at the very start of a measure/beat, the note you attach it to needs to start ON the beat, but labels can also be set on Rest Notes, should they be needed.
Labels:
Labels are reference points that allow you to quickly navigate or "Fast Travel" to multiple areas of a UST, simply right click the TOP HALF of the Tempo Timeline to attach a Label to a note.

With a label attached, whenever you Right Click the TOP HALF of the Tempo Timeline, you can now instantly move to any label in your UST.

Tempo Markers:
Right Clicking the BOTTOM HALF of the Tempo Timeline allows you to attach Tempo Markers to a note, when the note with the tempo marker is reached in the UST, the BPM of the file will change, allowing UTAU vocalists to sing songs with tempo changes.

