


Operation Guides
Tuning, Flags & Rendering
Before you begin:
- This guide was written and coordinated by members of the UTAU community and has no affiliation with the UTAU software itself or its creator.
- This guide was written with users of WINDOWS 10 in mind, advice does not immediately translate to other operating systems or other versions of UTAU, such as UTAU-Synth for MacOS.
- This guide relates to the original UTAU software by Ameya which released in 2008 and NOT OpenUTAU, the fanmade UTAU alternative, as such the utility of this resource may vary.
- While the process of operating UTAU is ultimately safe when done correctly, JOEZCafe and other parties involved in JOEZUTAU projects take no responsibility for any incidents, loss or damage to users or property from following these instructions.
Introduction to Tuning:
At this stage, you should have a fully constructed UST that allows your voicebank of choice to sing smoothly. The last major step in making UTAU vocals is pitch manipulation, otherwise known as "Tuning" the vocals so they sound more expressive and less flat.
There are a series of major steps you should do to set up your UST so it's ready for tuning.
Ensure Mode2 is enabled in UTAU:
UTAU has two modes for pitch manipulation.
Mode1 is a more manual process that involves moving individual pitch envelopes in a single note.
While Mode1 allows for a more detailed and precise form of pitch manipulation, it's commonly regarded as being so time consuming and complicated that it's almost never recommended.
To contrast, Mode2 is a more streamlined approach to pitch manipulation that involves creating and placing pitch envelopes that automatically curve into each other, with a series of other extras such as built-in Portamento and Vibrato functionality.
Mode2 is the most commonly used and recommended method of tuning, classing it as a necessity in your UTAU workflow.

To enable Mode2, simply select the Mode2 button on the toolbar at the top of the screen, if the button is highlighted and you see two additional buttons, Trade and Render, that means Mode2 is enabled, allowing you to follow the rest of this tuning guide.

Enable Portamento on all notes:
Portamento is a term used in music theory to describe the gradual transition in pitch between notes.

In UTAU, Portamento is a parameter in Mode2 that applies pitch lines to your notes, allowing the pitch to gradually transition rather than "Snap" between notes. To apply Portamento, highlight all of the notes in your UST by pressing CTRL+A, right click your selection, then select Pitch.

This is the Mode2 Pitch Control menu, we will be using this a lot during the tuning process.
In this menu, check the Portamento box at the top, this will enable Portamento on all the notes in your selection. You can tell Portamento is enabled on a note if two envelopes forming a red line appear on the note's left hand side.

Be careful when toggling Portamento on and off while any notes that are already tuned are selected as doing so resets any pitch envelopes you've already created!
If you're partway through tuning your file and notice some notes don't have Portamento enabled, enable these notes individually to reduce the likelihood of affecting the rest of the file.
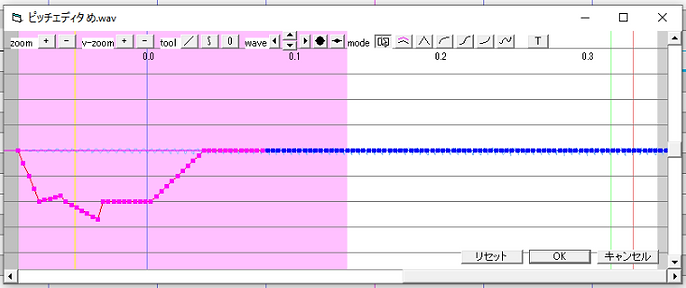
Pitch Envelopes:
By default, each note with Portamento enabled has two envelopes at the beginning that directly transition between the selected note and the note before it, but this can often sound flat and dull in its default state. It's here that we can add a more complex attack to note to bring more colour and personality to the vocals.

Right clicking a pitch envelope will bring up the pitch bend context menu, it's here that you can change the shape of the bend between the selected envelope and the envelope that comes before it, create a new envelope or go to the selected note's Mode2 Pitch Control window.

Creating a new envelope is done by selecting Add Control Point (or by pressing A on your keyboard after right clicking an existing envelope).
The envelope created will always appear directly in front of the selected envelope.
Click and drag each envelope to change its position and the connecting lines will re-form accordingly. Moving an envelope up and down changes how high and low the voice will bend in pitch while moving it left and right makes the envelope affect the voice earlier or later in the note.

You can also adjust the timing of the first envelope in a note by moving it to an earlier portion of the sequence, this allows the envelope to affect the pitch of the prior note simultaneously, giving you full control of the transition between two notes.
When you press Play, the voicebank will follow the pitch line as it processes the notes, leading to a different singing style, experiment with different shapes and lines for more rich sounding vocals!

Vibrato:
Vibrato is the act of a singer "pulsating" their voice as they sing, making the pitch move up and down repeatedly. This is a vocal technique that sacrifices the base pitch of a note in exchange for a more dynamic and emotional sustain when used appropriately.

Vibrato settings are accessed by right click the note you wish to add vibrato to and going to the Mode2 Pitch Control window. Checking off the vibrato box on the lower half of the window adds an automatic vibrato line to the note.

Once added to a note, the Vibrato Control will appear below a note when it is highlighted, you can then tweak the vibrato using 7 different parts.

1. Clicking and dragging the vertical line on the far left of the vibrato control changes the Offset, or how far into the note the vibrato begins.
2. Dragging the small square below the main body of the vibrato control adjusts the Phase, which fine tunes the position of the vibrato across the note without changing the Offset.
3. Dragging the small square inside the main body adjusts the Frequency, which affects the speed of the vibrato's pitch dynamics.
4. Dragging the leftmost vertical line inside the main body affects the Fade In, the length in which the vocalist gradually raps up in Depth from the Offset.
5. Dragging the rightmost vertical line inside the main body affects the Fade Out, the length in which the vocalist gradually levels out the Depth toward the end of the note.
6. Dragging the inside of the box inbetween the two vertical fade lines affects the Pitch Deviation, allowing the core pitch of the vibrato to gradually move up or down the piano roll.
7. Dragging the borders of the Pitch Deviation box adjusts the Depth, this makes the vibrato taller or narrower across the piano roll to affect how much the vocalist deviates from the core pitch.
Consonant Velocity:
Consonant Velocity is a parameter that allows you to shrink or expand the size of a note's Overlap, affecting the way two samples transition between each other.
This is useful for making the transition between two samples more sudden or more drawn out.

The Consonant Velocity parameter can be found by right clicking a note and entering its Note Properties, it can be adjusted anywhere between 0 & 200.
- 0 doubles the overlap, making it longer and earlier.
- 100 is the Default overlap, which sounds the most natural.
- 200 halves the overlap, making it later, snappier and more sudden.
These changes are then reflected with the position of the thin overlap line on the left hand side of the selected note.
Introduction to Flags:
Flags are a parameter interface in UTAU that let you adjust the tonal quality of your vocals by entering numerical values.
Flags can be entered on a per note basis via the "Flags" field in the Mode2 Note Properties window or can be applied to the entire UST via the "Rendering Options" field in the Project Configurations window.
Flags are entered in a field by entering a character that represents a particular parameter, followed by a numerical value that affects its significance on the vocal.
For example: g+3 changes the Gender Factor of a note/UST to +3
When entering multiple flags into a note/UST, the flags must be entered as one line with no spaces.
For example: g+3Mt-20 changes the Gender Factor to +3 and Tension to -20
Recommended Flags
The following is a list of commonly used flags that are highly recommended for your UST making process:
g
Base Value: 0
Setting Range: -100 ... +100
g is the Gender Factor flag, which adjusts the Formant of the voice without changing the pitch. Positive (+) values make the voice more deep and masculine, Negative (-) values make the voice more nasally, feminine and chipmunk-like.
This can be used to customise the voice's brightness and colour to your liking.
P
Base Value: 86
Setting Range: 0 - 100
P is the Peak Compressor flag, which adjusts the peak volume of your vocals.
Simply put, the Peak Compressor affects the strength of the compression in UTAU's singing synth.
The higher the value, the more compressed the audio, making quiet noises louder.
The lower the value, the less compressed the audio, making the distinction between loud and quiet noises broader.
Lowering this flag from its base value is recommended for dampening the severity of sounds that could get amplified in UTAU, like background noise and hard consonants.
Mt (Only compatible with Moresampler)
Base Value: 0
Setting Range: -100 ... +100
Mt is a Tension flag that is exclusive to USTs that have Moresampler equipped (For more info, see Recommended Tools in Section 1).
Similar to the Tension Parameter from the commercial vocalsynth Synthesizer V.
Mt changes the level of compression and EQ on a sample to simulate a change in vocal tone.
Higher values make the voice sound more compressed and "radio-like" with the benefit of making the voice harsher and more powerful.
Lower values make the voice more muffled, with the benefit of making the voice softer and whispery.
Mt is a highly recommended flag for UTAU as it allows users to apply more tonal versatility to any voicebank, even ones that aren't Multi-Expression.
Mt can even be used in combination with Multi-Expression samples to create new, theoretical expressions.
For example: JYOZE's Primary Series voicebanks have 3 Recorded Expressions which bump up to 9 Theoretical Expressions when Mt is used.

Rendering & Exporting:
At this stage, you now have a finished vocal track, you should also have familiarity with how UTAU handles playback, via highlighting a set of notes, then rendering them for preview in the software once you press the Play button.
There are two methods of fully rendering your UST into an audio file to use in your audio workstation:
Method 1 - Rendering a full .WAV file
This option is best for when you want to render your entire UST into one audio track, this can be done by simply saving your UST, then naviating to Project > Render wav file.
Method 2 - Saving your last play
This option is best for situations where you only wish to render a small portion of your UST to shorten render times or divide your UST into multiple audio files, simply highlight the portion you wish to render and select Play as you would for a standard playback.
Once your playback has rendered, stop the playback, then navigate to Play > Save Last Play, the selection you last previewed in your UST will be instantly saved as its own .WAV file.